# SAML Integration
SAML2 is version 2 of SAML (Security Assertion Markup Language), an XML-based standard for exchanging authentication and authorization data. The document of SAML2 Specifications is available here (opens new window).
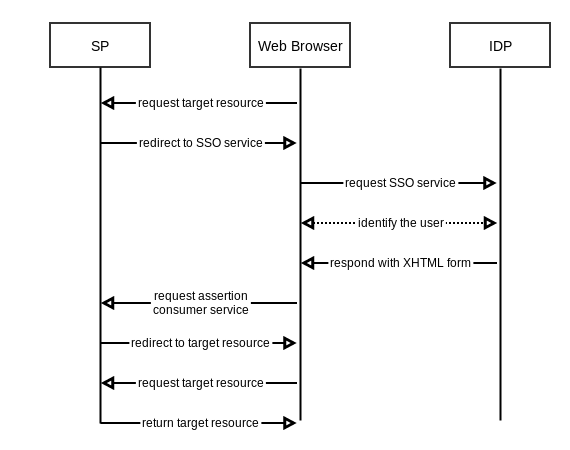
According to SAML2 Specifications, two parties which exchange authentication and authorization data are called SP (Service Provider) and IDP (Identity Provider). IDP issues the security assertion and SP consumes it. The following scenario describes a SAML2 exchange:
- A user, via web browser, requests a resource at the SP.
- The SP checks and finds no security context for the request, then it redirects to the SSO service.
- The browser requests the SSO service at IDP.
- The IDP responds with an XHTML form after performing security check and identifying the user. The form contains SAMLResponse value.
- The browser requests assertion consumer service at the SP.
- The consumer service processes the SAMLResponse, creates a security context and redirects to the target resource.
- The browser requests target resource again.
- The SP finds a security context, so it returns the target resource.

eXo Platform SAML integration supports the SP role thus can be integrated with various IdP providers (opens new window) such as Salesforce or Shibboleth.
This chapter covers the following subjects:
# eXo Platform as SAML2 SP
- Install SAML2 add-on with the command:
$PLATFORM_SP/addon install exo-saml
- Open the file
$PLATFORM_SP/gatein/conf/exo.properties.
Edit the following properties (add them if they don't exist):
# SSO
gatein.sso.enabled=true
gatein.sso.saml.sp.enabled=true
gatein.sso.callback.enabled=true
gatein.sso.valve.enabled=true
gatein.sso.valve.class=org.gatein.sso.saml.plugin.valve.ServiceProviderAuthenticator
gatein.sso.filter.login.sso.url=/portal/dologin

gatein.sso.filter.initiatelogin.enabled=false
gatein.sso.filter.logout.enabled=true
gatein.sso.filter.logout.class=org.gatein.sso.saml.plugin.filter.SAML2LogoutFilter
gatein.sso.filter.logout.url=${gatein.sso.sp.url}?GLO=true
gatein.sso.saml.config.file=${exo.conf.dir}/saml2/picketlink-sp.xml

# Custom properties

gatein.sso.sp.host=SP_HOSTNAME
gatein.sso.sp.url=${gatein.sso.sp.host}/portal/dologin
gatein.sso.idp.host=IDP_HOSTNAME
gatein.sso.idp.url=IDP_SAML_ENDPOINT
gatein.sso.idp.url.logout=IDP_SAML_ENDPOINT_LOGOUT
gatein.sso.idp.alias=IDP_SIGNING_ALIAS
gatein.sso.idp.signingkeypass=IDP_SIGNING_KEY_PASS
gatein.sso.idp.keystorepass=IDP_KEYSTORE_PASS
# WARNING: This bundled keystore is only for testing purposes. You should generate and use your own keystore!
gatein.sso.picketlink.keystore=${exo.conf.dir}/saml2/jbid_test_keystore.jks
You need to modify gatein.sso.idp.host, gatein.sso.idp.url, gatein.sso.idp.url.logout, gatein.sso.idp.alias, gatein.sso.idp.signingkeypass and gatein.sso.idp.keystorepass according to your environment setup. You also need to install your own keystore as instructed in Generating and using your own keystore.
TIP
If your IDP send username in assertion with some char in capital letter, and you want to force lower case, you can add this property :
gatein.sso.saml.username.forcelowercase=true
- Download and import your generated IDP certificate to your keystore using this command:
keytool -import -keystore $PLATFORM_SP/gatein/conf/saml/jbid_test_keystore.jks -file idp-certificate.crt -alias Identity_Provider-idp
TIP
The Default password of the keystore jbid_test_keystore.jks is store123.
- Start up the platform: use the following command on Linux operating systems:
./start_eXo.sh
and use this command for Windows operating systems:
start_eXo.bat
# Use Encrypted Assertions
To increase the security of your transactions, it is possible to encrypt assertions between eXo Platform as Service Provider and the IDP.
For that, you will need to generate a couple private key/public key, stored in the keystore of eXo Platform, and then provide it to the IDP.
# Generating and using your own keystore
The default jbid_test_keystore.jks is useful for testing purpose,
but in eXo Platform you need to generate and use your own keystore as
follows. Remark : in this example, the certificate is self-signed, which have no impact on key usage in IDP.
If necessary, you can sign your certificate with a Certificate Authority.
- Create private key and certificate :
openssl req -newkey rsa:4096 -keyout private.key -x509 -days 365 -out certificate.crt
- Transform certificate and private key in p12 file :
openssl pkcs12 -export -out certificate.p12 -inkey private.key -in certificate.crt
- Add p12 file in jsk store
keytool -v -importkeystore -srckeystore certificate.p12 -srcstoretype PKCS12 -destkeystore secure-key.jks -deststoretype JKS
You will be asked to enter a keystore password and a key password. Remember them to use in next steps. This command create a couple (publicKey, privateKey). During IDP configuration, you can provide the publicKey to the IDP, which will use is to encode the assertion content. Then, when eXo receive the assertion, it uses the privateKey present in the keystore to decode the assertion.
Install your file to
PLATFORM_*/gatein/conf/saml2/Modify picketlink configuration properties to provide your keystore password and a key password. In exo.properties file, change properties
gatein.sso.idp.alias=1
gatein.sso.idp.keystorepass=store123
gatein.sso.idp.signingkeypass=password
gatein.sso.picketlink.keystore=${exo.conf.dir}/saml2/secure-key.jks
TIP
During the import of the key in the keystore, the alias used is 1
TIP
On Windows, you should use the absolute link to the keystore file, for the property gatein.sso.picketlink.keystore.
# Configure IDP
After creating your jks file, you need to configure the IDP to encrypt assertions, and provide him the public key.
If you need to display the public key from the certificate in the jks file :
keytool --list -rfc -keystore secure-key.jks
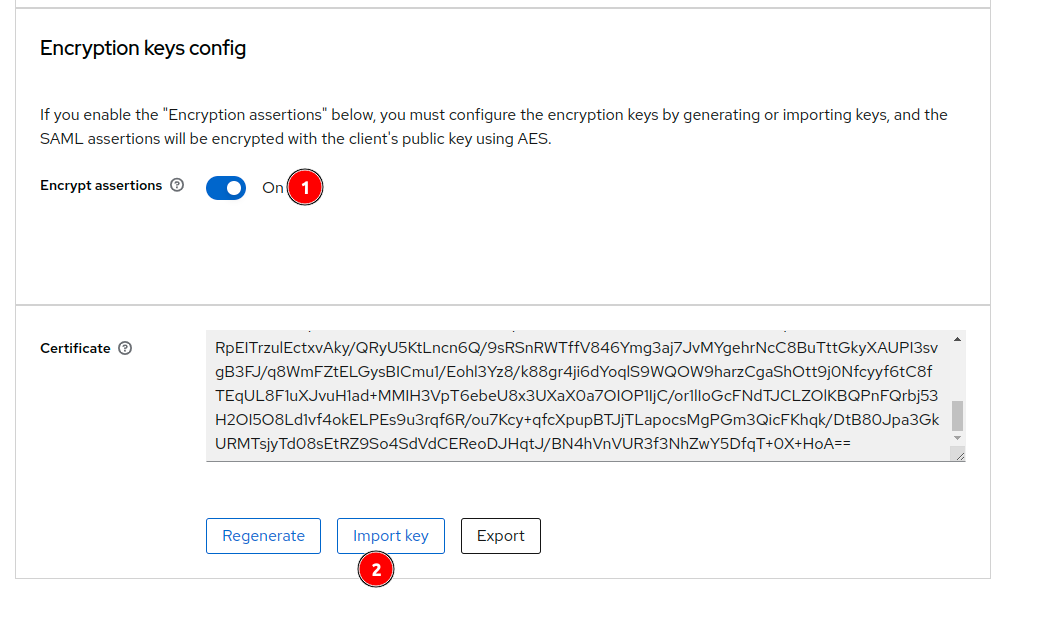
For example in Keycloack, you can provide the jks file when activating assertion encryptions :

Remember that your jks file contains couple (publicKey, privateKey). You need to export the publicKey only in a new jks to send only the public key to the IDP. Extract public cert from jks :
keytool -export -alias 1 -keystore secure-key.jks -rfc -file public-cert.cert
Add cert in a new jks
keytool -importcert -file public-cert.cert -keystore public-key.jks -alias 1
Now, when you log into eXo, the assertions responses coming from the IDP are encrypted.
# Configure NameId Format in SAMLRequest
The property gatein.sso.saml.nameid.format allow to configure the wanted nameid format. By dafault, value is urn:oasis:names:tc:SAML:2.0:nameid-format:persistent. It can be changed to urn:oasis:names:tc:SAML:1.1:nameid-format:unspecified if needed
# Use assertion with persistent or transient nameid
Some IDP requires that nameid contains a unique identifier, which will not change during this. In this case, we need that IDP provide the user name or the email in another assertion attribute.
- On IDP side, configure the Client scope to provide username or email in an attribute of the assertion. Note the name of the attribute, for example
uid. - on eXo side, set the property
gatein.sso.saml.use.namedid=falseandgatein.sso.saml.subject.attributeto the name of the attribute you want to use. For example, if you setgatein.sso.saml.subject.attribute=uid, eXo will use the value of theuidattribute in the assertion as username.
TIP
The user can be identified by his username or by his email.