# Add-ons Management
An add-on could be a set of extensions, customizations, xml configurations, applications, templates or any new services packaged in a zip archive. In other words, an add-on could be whatever that extends eXo Platform capabilities by adding services, resources, and more.
The easiest way to manage add-ons is to use the eXo Add-ons Manager that is shipped by default in all versions superior to 4.3. The eXo Add-ons Manager defines a standard approach of packaging, installing/uninstalling and updating the available add-ons. With the eXo Add-ons Manager, you, as administrators, can enhance your management of the add-ons installed on the eXo Platform instances via the Command Line Interface (known as CLI), in a simple manner.
Basically, start with the launch scripts:
$PLATFORM_HOME/addon(Windows, Linux / Mac OX)$PLATFORM_HOME/addon.bat(Windows)
When running the addon script only, you can view different sets of commands, arguments and options. The global syntax is in the format addon [command] [arguments] [options], where:
- command is either of: list, install, uninstall, describe.
- arguments are ones specific to an add-on (Id and version).
- options are switch options that can be global or specific to the command (started with -- or -).
Also, you could add the following useful options:
--help / -h- Views all the needed information of the command line program.--verbose / -v- Prints the verbose log for debugging/diagnostic purpose.
By walking through the following topics in this chapter, you will know how to manage add-ons in eXo Platform via the CLI:
Listing add-onsDescribing add-onsInstalling/Uninstalling add-onsInstalling/Uninstalling add-ons in a docker containerUsing the Add-ons manager behind a proxy server
# Listing add-ons
Use the list command to view add-ons of the catalog and their needed information (Id and versions).
addon list [--snapshots] [--unstable] [--installed] [--outdated] [--catalog=$URL] [--no-cache] [--offline] [--verbose] [--batch-mode]
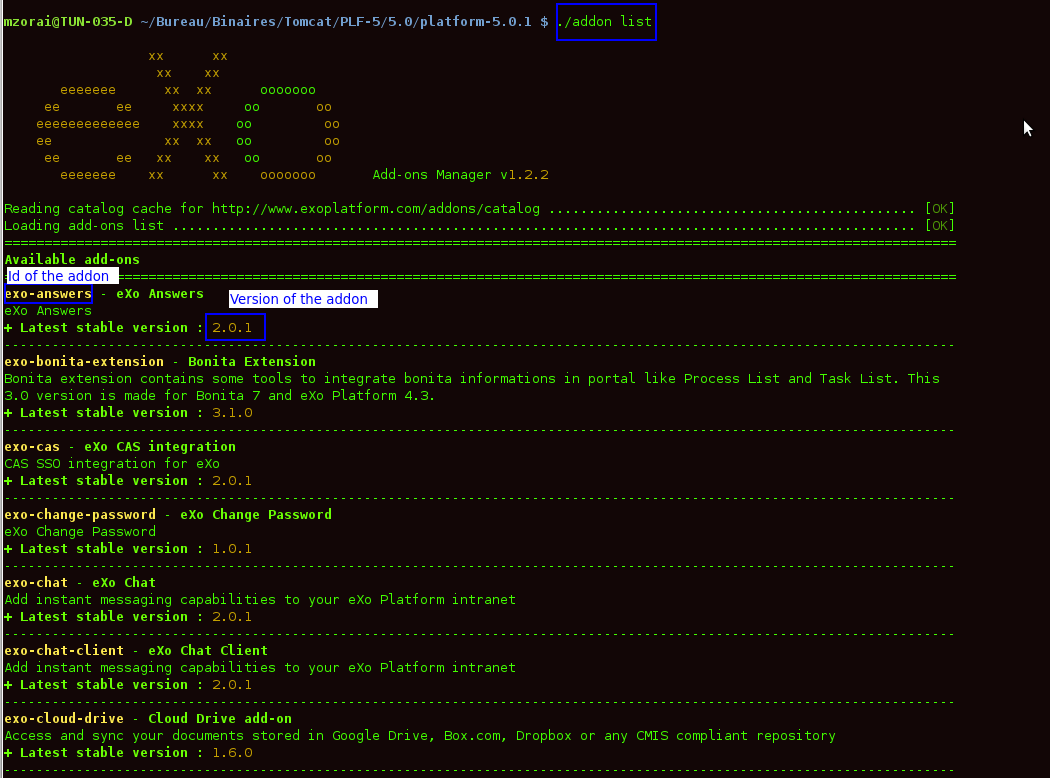
With the addon list command (without any options), only add-ons that have at least one stable version are displayed. And for each listed add-on, only the last stable version is displayed.
Also, add the following options:
--snapshots: Displays add-ons that have stable or development versions. For each listed add-on, only the last stable and the last development versions are displayed.--unstable: Displays add-ons that have stable or unstable versions. For each listed add-on, only the last stable and the last unstable versions are displayed.--installed: Displays add-ons (including stable and development versions) that are already installed in eXo Platform.--outdated: Displays stable add-ons that have newer versions than ones installed in eXo Platform - based on the aether generic version order (opens new window).--no-cache: Displays add-ons by re-downloading the remote catalog (opens new window).--offline: Displays add-ons by the cached and local catalogs (without the network access).--catalog=$URL: Displays add-ons by a remote catalog URL where URL is an alternative location for the catalog (for example, http://example.org/remote.json (opens new window)).--no-compat: Displays add-ons that ignores the compatibility check of application servers, editions and version range (corresponding to supportedApplicationServers, supportedDistributions and compatibility respectively in each catalog entry).--batch-mode: Displays add-ons without the ASCII art logo (eXo art text displayed right after the command on the CLI).
# Describing add-ons
Use the describe command to display more information of an individual add-on (for example, available versions, name, description, license).
addon describe addonId[:addonVersion] [--no-cache] [--offline] [--catalog=$URL] [--batch-mode]
For instance, to see information of the exo-chat add-on, use this command: addon describe exo-chat:version
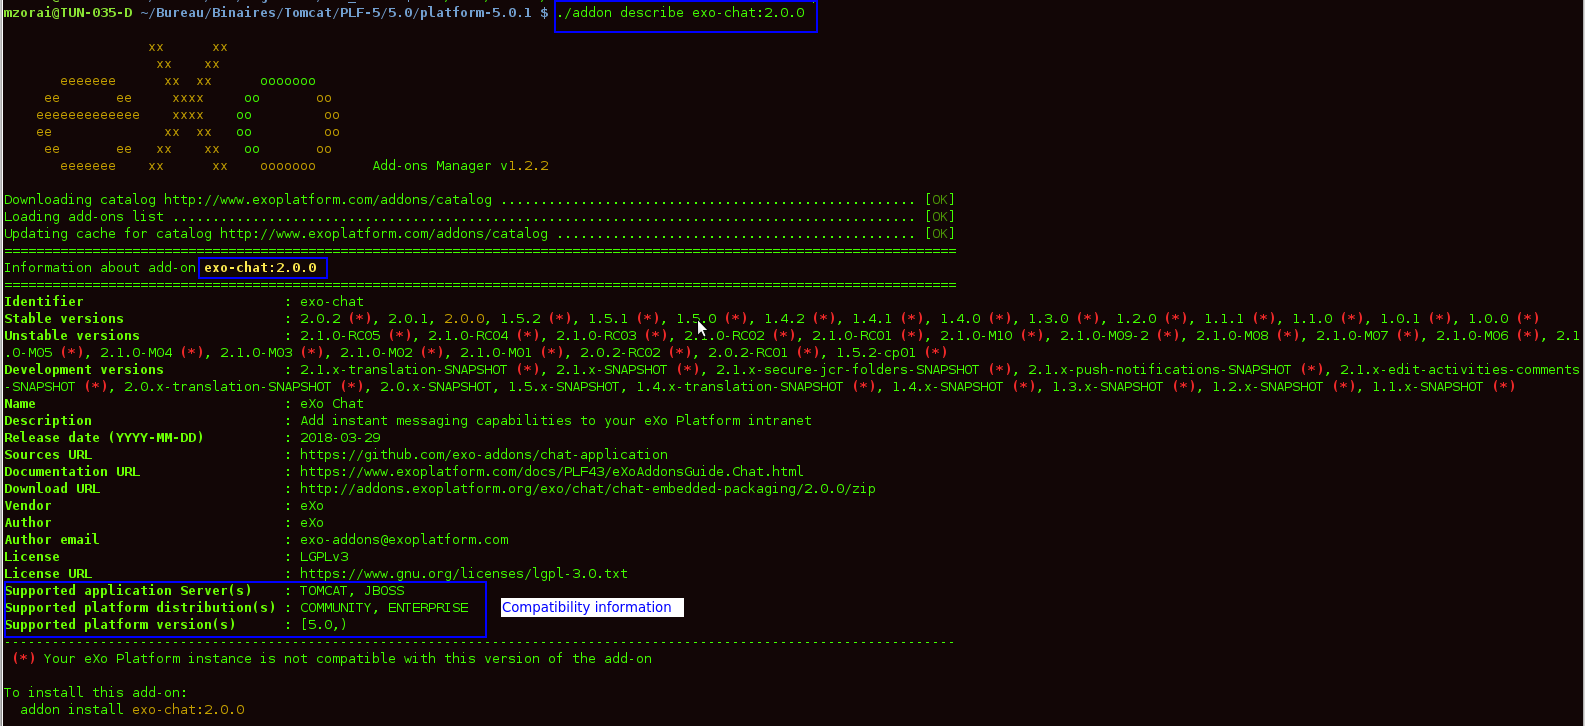
You will see that the add-on version is compatible with eXo Platform Enterprise Edition 5.0.1.
In case you do not include the addonVersion, the eXo Add-ons Manager will display information of the latest development version of that add-on:
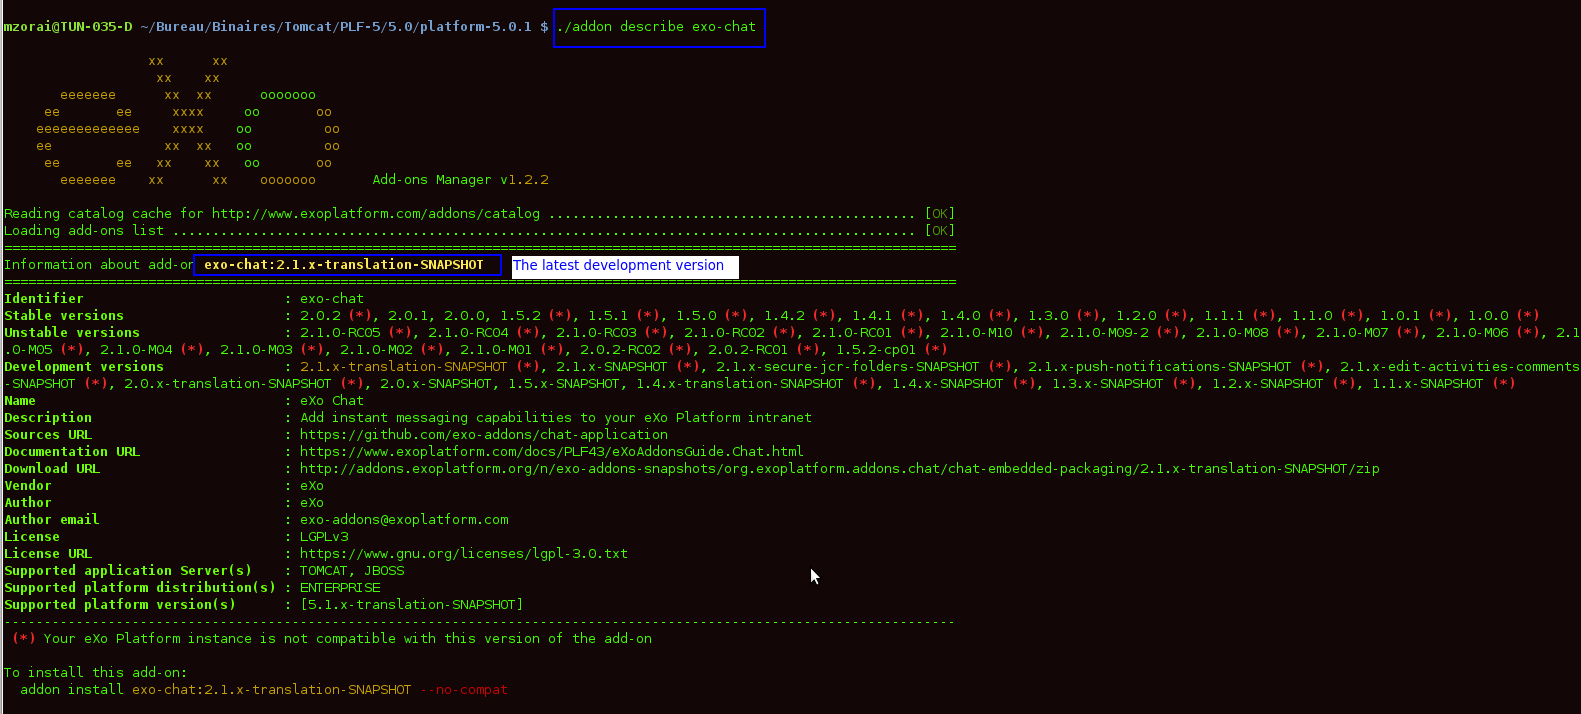
The usage of the other options is in the same way as the list command.
# Installing/Uninstalling add-ons
# Installing an add-on
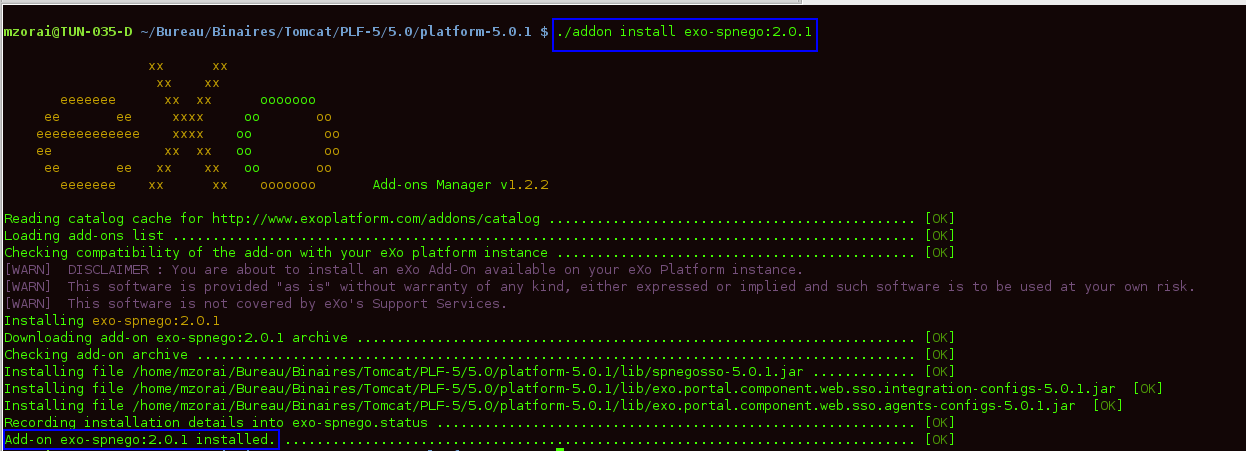
Use the install command to control installation of an add-on.
addon install addonId [--snapshots] [--unstable] [--force] [--no-compat] [--conflict=skip|overwrite] [--catalog=$URL] [--no-cache] [--offline] [--verbose] [--batch-mode]
Or:
addon install addonId:addonVersion [--force] [--no-compat] [--conflict=skip|overwrite] [--catalog=$URL] [--no-cache] [--offline] [--verbose][--batch-mode]
TIP
Some eXo add-ons require the end-users to accept terms of a license agreement before installation. So, after clicking the install command on the CLI, remember to hit Enter key (for several times) to continue, and finally type "Yes" on the CLI to accept the license agreement. You can get out of these interactions by adding the --batch-mode option that allows the complete auto-installation.
By using the addon install addonId command only, the most recent stable version of the add-on will be installed. Before choosing a specific version for installation you should check all related information of this add-on by using Describing command.
Also, add the following options:
--snapshots: Installs the most recent development version of the add-on. However, if the last stable version of this add-on is more recent than the last development one, the last stable one will be installed.--unstableInstalls the last unstable version of the add-on, based on the [aether generic version order http://download.eclipse.org/aether/aethercore/0.9.0.M2/apidocs/org/eclipse/aether/util/version/GenericVersionScheme.html However, if the last stable version of this add-on is more recent than the last unstable one, the last stable one will be installed.:addonVersionInstalls a specific version of the add-on.--no-compatInstalls the add-on that ignores the compatibility check of application servers, editions and version range declared in each catalog entry (corresponding to supportedApplicationServers, supportedDistributions and compatibility respectively). This option is often used when you meet error messages of the compatibility (for example, app server not supported, distribution enterprise required, not compatible to {eXoplatform_version}).--conflict=skip|overwriteInstalls the add-on that ignores the files conflict. This option is used when you meet an error message of the aborted installation.--conflict=skip: The conflicted files are ignored with one log for each file: File $FILE already exists Skipped.--conflict=overwrite: The conflicted files are overwritten by the one contained in the add-on with one log for each file: *File $FILE already exists Overwritten.
--offlineInstalls the add-on that already exists in the local archives without downloading. You will get an informational message: Using addonId archive from local archives directory.. |--forceEnforces the reinstallation if the add-on is detected to have already been installed.--catalogUses in the same way as thelistcommand.--no-cache
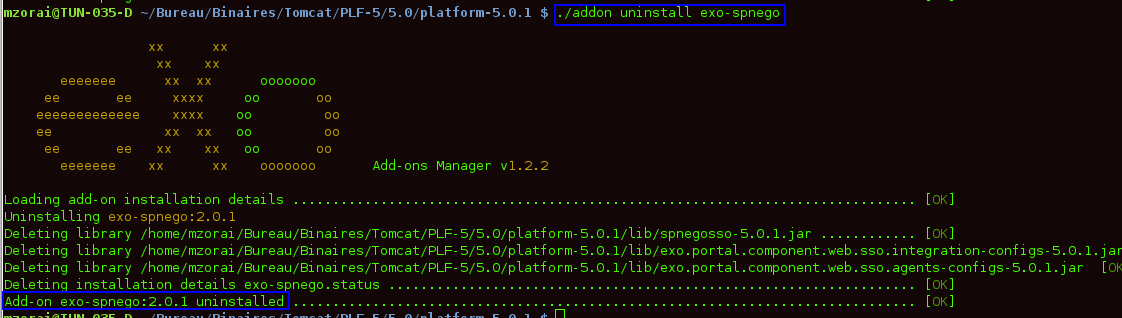
# Uninstalling an add-on
Use the uninstall command to remove an add-on that is already installed, regardless of its stable or development version.
addon uninstall addonId [--verbose] [--batch-mode] [--conflict=overwrite]
# Installing/Uninstalling add-ons in a docker container
# Installing an add-on in a docker container
To install add-ons you can use the -e EXO_ADDON_LIST option. It will instruct docker to install a list of indicated add-ons before it starts eXo Platform.
This command starts eXo Platform and installs the add-ons exo-tasks and exo-answers version 1.3.x-SNAPSHOT:
    docker run -d \
    -p 8080:8080 \
    -e EXO_ADDONS_LIST="exo-tasks:1.3.x-SNAPSHOT,exo-answers:1.3.x-SNAPSHOT" \
    exoplatform/exo-community
Where EXO_ADDONS_LIST contains the list of add-ons that you want to install in your eXo Platform docker container.
The execution of this command will launch the server startup in background i.e it will not display the server log startup. To display it, just run this command:
docker logs --follow <CONTAINER_ID>
Where the CONTANIER_ID could be known when executing this command:
docker ps -a
Displaying the container logs will print the stacktrace about addons installation:
    # ------------------------------------ #
    # eXo add-ons installation start ...
    # ------------------------------------ #
    # installing add-ons from EXO_ADDONS_LIST environment variable:
    eXo Add-ons Manager v1.2.0-M08
    -------------------------------------------------------------------------------
    Downloading catalog http://www.exoplatform.com/addons/catalog ............ [OK]
    Loading add-ons list ..................................................... [OK]
    Updating cache for catalog http://www.exoplatform.com/addons/catalog ..... [OK]
    Checking compatibility of the add-on with your eXo platform instance ..... [OK]
    [WARN]  DISCLAIMER : You are about to install an eXo Add-On available on your eXo Platform instance.
    [WARN]  This software is provided "as is" without warranty of any kind, either expressed or implied and such software is to be used at your own risk.
    [WARN]  This software is not covered by eXo\'s Support Services.
    Installing exo-tasks:1.3.x-SNAPSHOT
    Downloading add-on exo-tasks:1.3.x-SNAPSHOT archive ...................... [OK]
    Checking add-on archive .................................................. [OK]
    Installing file /opt/exo/webapps/task-management.war ..................... [OK]
    Installing file /opt/exo/lib/task-management-services.jar ................ [OK]
    Installing file /opt/exo/lib/task-management-integration.jar ............. [OK]
    Recording installation details into exo-tasks.status ..................... [OK]
    Add-on exo-tasks:1.3.x-SNAPSHOT installed. ............................... [OK]
    eXo Add-ons Manager v1.2.0-M08
    -------------------------------------------------------------------------------
    Reading catalog cache for http://www.exoplatform.com/addons/catalog ...... [OK]
    Loading add-ons list ..................................................... [OK]
    Checking compatibility of the add-on with your eXo platform instance ..... [OK]
    [WARN]  DISCLAIMER : You are about to install an eXo Add-On available on your eXo Platform instance.
    [WARN]  This software is provided "as is" without warranty of any kind, either expressed or implied and such software is to be used at your own risk.
    [WARN]  This software is not covered by eXo\'s Support Services.
    Installing exo-answers:1.3.x-SNAPSHOT
    Downloading add-on exo-answers:1.3.x-SNAPSHOT archive .................... [OK]
    Checking add-on archive .................................................. [OK]
    Installing file /opt/exo/lib/answers-services-1.3.x-SNAPSHOT.jar ......... [OK]
    Installing file /opt/exo/webapps/faq.war ................................. [OK]
    Installing file /opt/exo/lib/answers-plf-integration-1.3.x-SNAPSHOT.jar .. [OK]
    Installing file /opt/exo/webapps/answers-extension.war ................... [OK]
    Recording installation details into exo-answers.status ................... [OK]
    Add-on exo-answers:1.3.x-SNAPSHOT installed. ............................. [OK]
    # ------------------------------------ #
    # eXo add-ons installation done.
    # ------------------------------------ #
# Add-ons listing in a docker container
To list the available add-ons in a running eXo Platform docker container, run this command:
docker exec <CONTAINER_ID> /opt/exo/addon list
To know the add-ons alreadly installed, you should execute this command in a running eXo Platform container:
docker exec <CONTAINER_ID> /opt/exo/addon list --installed
An example for this command output:
    Loading add-on details from exo-tasks.status ............................. [OK]
    Loading add-on details from exo-answers.status ........................... [OK]
    Loading add-on details from meeds-es-embedded.status ....................... [OK]
    ===============================================================================
    Installed add-ons
    ===============================================================================
    exo-tasks -  eXo Tasks
    task and project management for personal and team productivity
    + Installed version : 1.3.x-SNAPSHOT
    -------------------------------------------------------------------------------
    exo-answers - eXo Answers
    eXo Answers
    + Installed version : 1.3.x-SNAPSHOT
    -------------------------------------------------------------------------------
    meeds-es-embedded - ElasticSearch Embedded in eXo Platform
    Embed ElasticSearch into eXo Platform
    + Installed version : 2.0.0-M08
    -------------------------------------------------------------------------------

    To uninstall an add-on:
        addon uninstall <addonId>
# Uninstalling an add-on in a docker container
To uninstall an add-on, you should add this parameter EXO_ADDONS_REMOVE_LIST with the a comma separated list of add-ons to uninstall:
    docker run -d \
    -p 8080:8080 \
    -e EXO_ADDONS_REMOVE_LIST="exo-tasks:1.3.x-SNAPSHOT,exo-answers:1.3.x-SNAPSHOT" \
    exoplatform/exo-community
# Using the Add-ons manager behind a proxy server
In order to use the Add-ons manager behind a proxy server, use the environment variable EXO_AM_OPTS to pass the proxy server parameters:
export EXO_AM_OPTS="-Dhttp.proxyHost=$httpProxyAdrs -Dhttp.proxyPort=$httpProxyPort -Dhttps.proxyHost=$httpsProxyAdrs -Dhttps.proxyPort=$httpsProxyPort"
Where:
$httpProxyAdrsand$httpProxyPortshould be respectively the values of your proxy hostname address and port for HTTP protocol.$httpsProxyAdrsand$httpsProxyPortshould be respectively the values of your proxy hostname address and port for HTTPS protocol.