# OAuth Integration
Starting from 4.3 version, eXo Platform allows users to log in using their social network accounts, including Facebook, Google+, Twitter, LinkedIn. Starting from 6.0 version, you can use an OpenId integration, which is based on OAuth protocol. To enable the feature, you need to do the main steps below:
- Registering an application on the social network you want.
- Making some configurations in
exo.propertiesto enable the social network with its registered application information. After startup of eXo Platform, the users can log in and register into eXo Platform via the corresponding social network. In this chapter: OverviewQuick introduction to the the UI flow after one social network is integrated with eXo Platform.Registering your OAuth applicationHow to register your OAuth applications, including Facebook, Google+, Twitter, LinkedIn, and OpenIdSetting up eXo PlatformSteps to configure eXo Platform that enable the social network with its registered application information.On-the-fly registrationIntroduction to the on-the-fly registration that allows administrator to skip the Registration form for the new social accounts.
# Overview
When a social network is integrated with eXo Platform, the UI flow will be as follows:
The login page will have new buttons below:
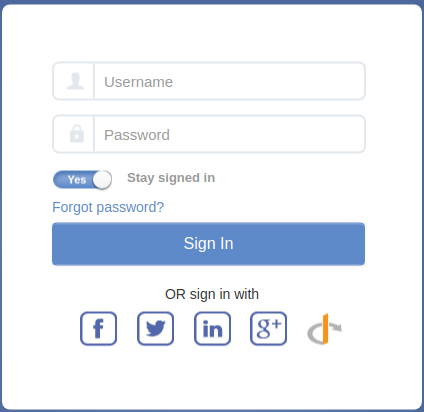
When clicking the Facebook button for example, the OAuth authorization flow starts. The user will be redirected to the Facebook page and be asked for login if not yet. Facebook then asks the user if he allows eXo to access his profile data.

If the user accepts, he is logged into eXo and redirected to the homepage.
# Registering your OAuth application
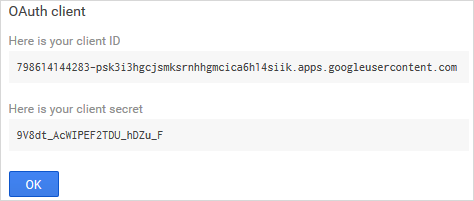
Registration will be detailed for each OAuth provider. But in all cases, the provider will give you a pair of Client ID/Secret needed for later configuration.
TIP
Pay attention to the Redirect URL that should match your server host and port. In the below instructions, it is assumed that your host is server.local.network.com.
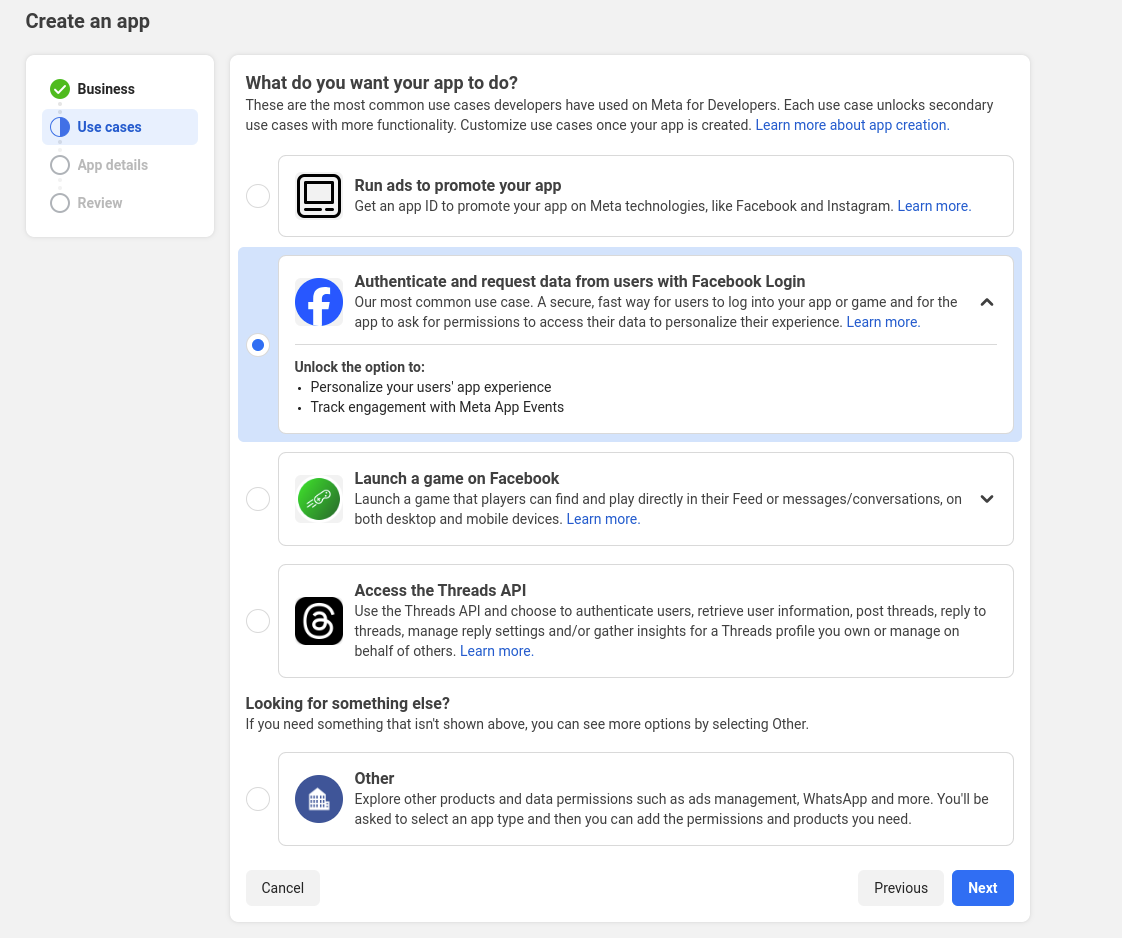
Go to https://developers.facebook.com/apps (opens new window) and register as a Facebook developer if not yet.
Click Create a New App. Choose the usecase 'Authenticate and request data from users with Facebook Login'
Here, enter appName and the application contact email
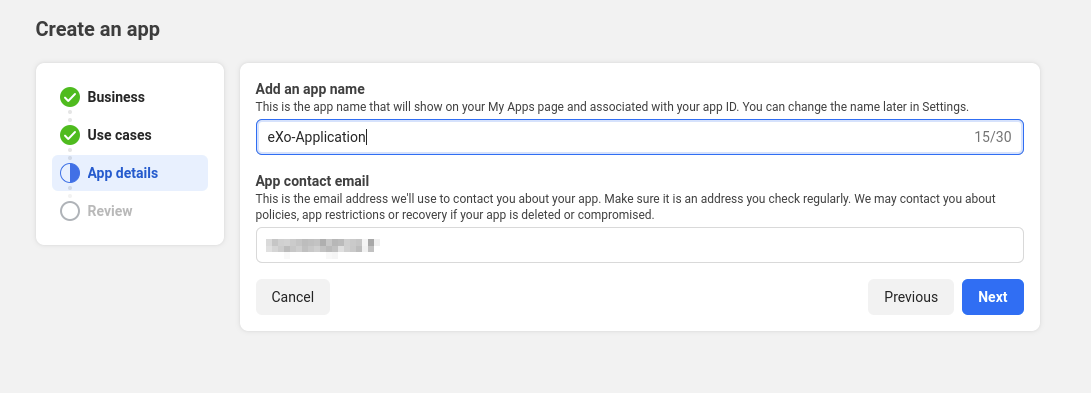
Click Create App
WARNING
To be able to publish the application and read user data, you will have to follow some verification steps required by Facebook : 'Business Verification', 'App Review'. Without these step, the application cannot be published.
until the application is published only declared users in 'Roles' can use the application, and so connect to your platform.
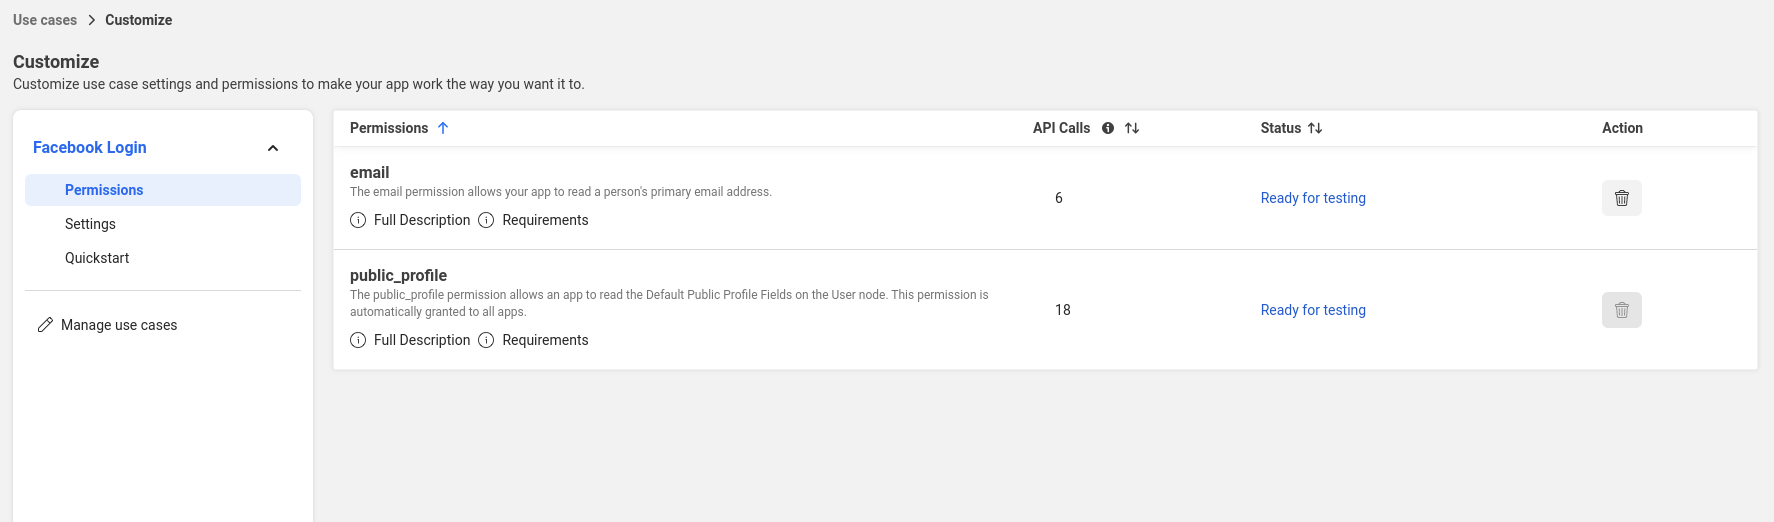
In your created application, select Usecases and click on 'Customize' for 'Authenticate and request data from users'
In 'Permissions' tab, ensure to active scopes 'email' and 'public_profile'
In 'Settings' tab, in 'Client OAuth settings', add the valid oauth redirect uri :
https://{domainName}/portal/facebookAuth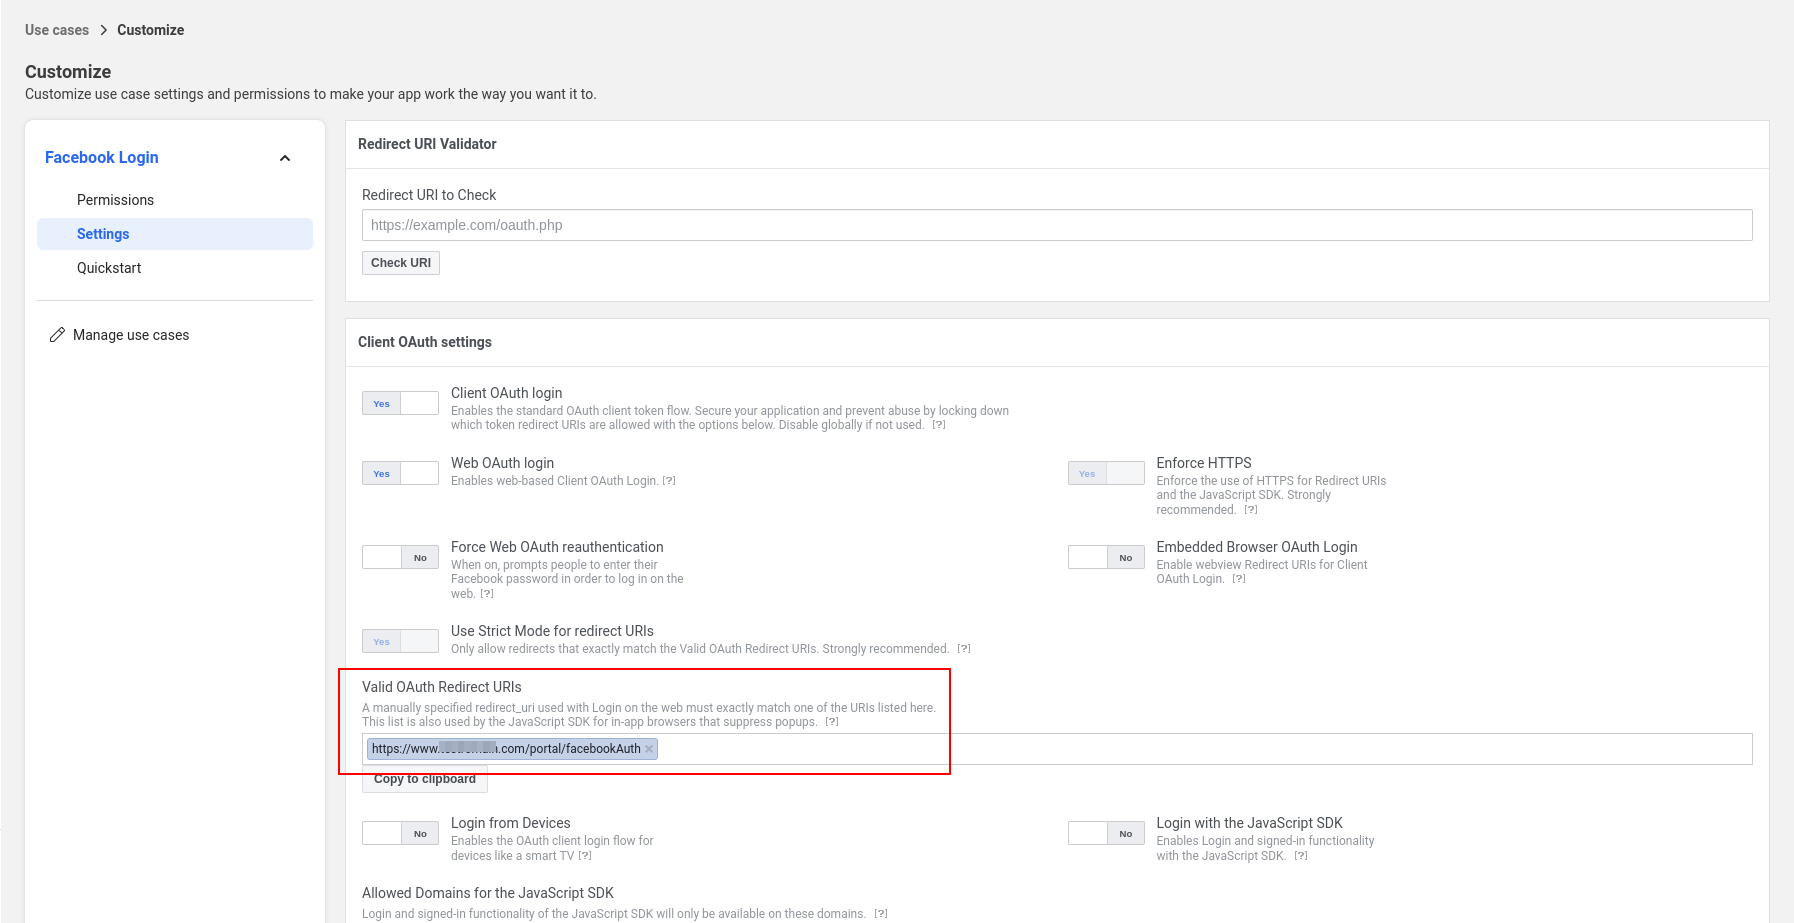
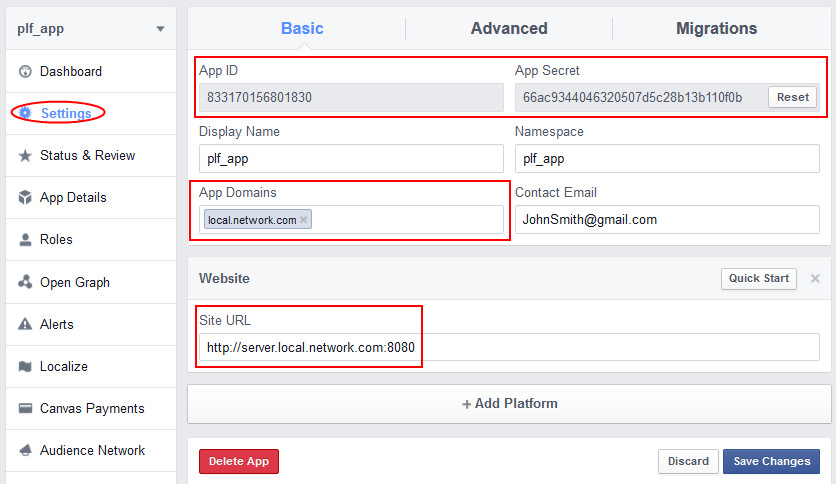
In your created application, select Settings. Here, input the values:
- yourdomain.com for App Domains.
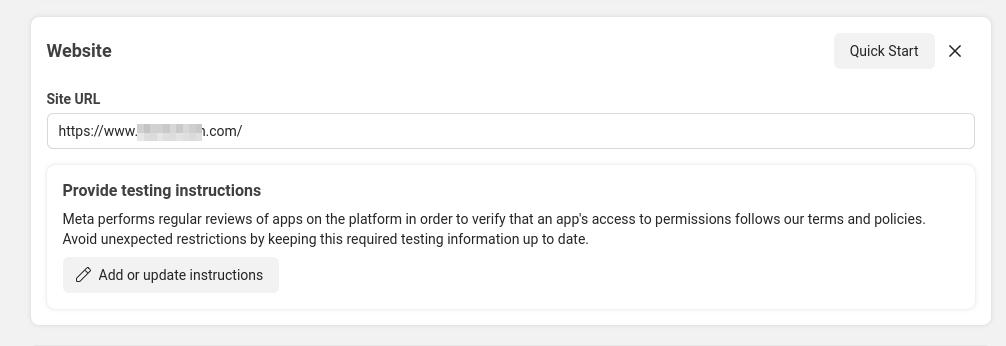
- https://www.yourdomain.com (opens new window) for Site URL (by selecting Add PlatformWebsite).
- Add required informations like logo, privacy policy urls ...
- Get clientId and clientSecret to provide it to eXo
Now, users registred in roles part use this application. To open it to all facebook users, you need to follow the validation process
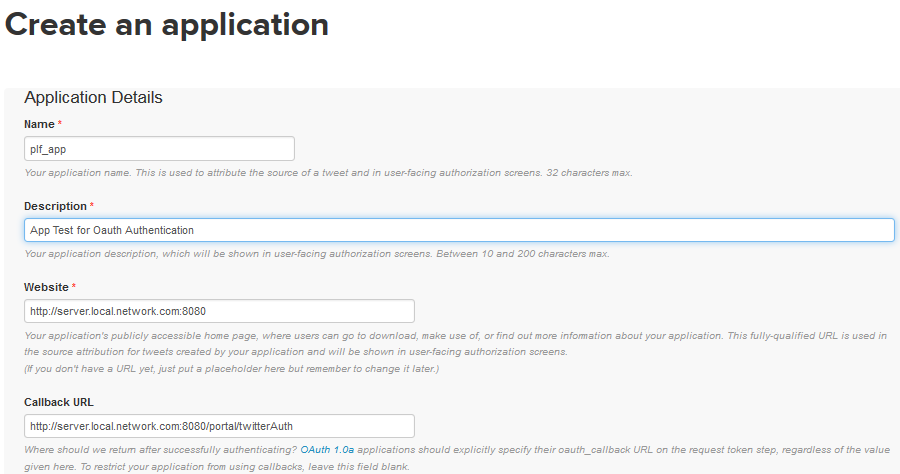
- Go to the Twitter Developer page (opens new window). From this page, go to the Manage Your Apps page (in the TOOLS category near the bottom), then register your application by clicking Create New App.
- Fill values for Name and Description. Use http://server.local.network.com:8080 (opens new window) and http://server.local.network.com:8080/portal/twitterAuth (opens new window) for Website and Callback URL respectively.
TIP
The Callback URL must be filled for Twitter to recognize that it is a web application which is trying to connect. Twitter will not accept http://localhost:8080/portal (opens new window) as a valid URL but you can use any, even http://www.twitter.com (opens new window). This field will be ignored but it cannot be left empty.
- In the created application, optionally edit it. In the Settings tab, you may need to enable the Sign in with Twitter feature (by ticking the Allow this application to be used to Sign in with Twitter checkbox). It is recommended you enable it, otherwise your users will need to authorize in Twitter after each login into eXo Platform. For the Access option, the default value as Read only is sufficient. After finishing the whole process, you should see in the Details tab as below:

Consumer Key and Consumer Secret (in Keys and Access Token tab) will be used to configure Client ID and Client Secret later.
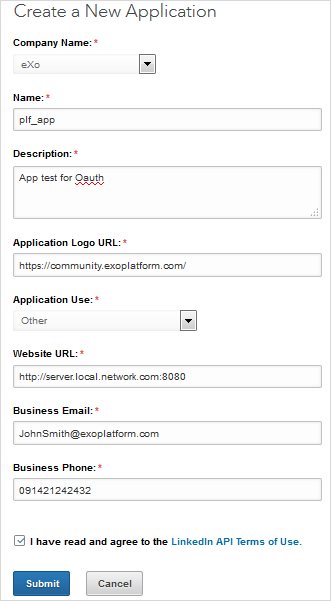
- Go to https://www.linkedin.com/developer/apps/ (opens new window). From this page, register your application by selecting Create App.
- Fill values for Name, Linkedin Page, Application Logo URL, and create App
- On
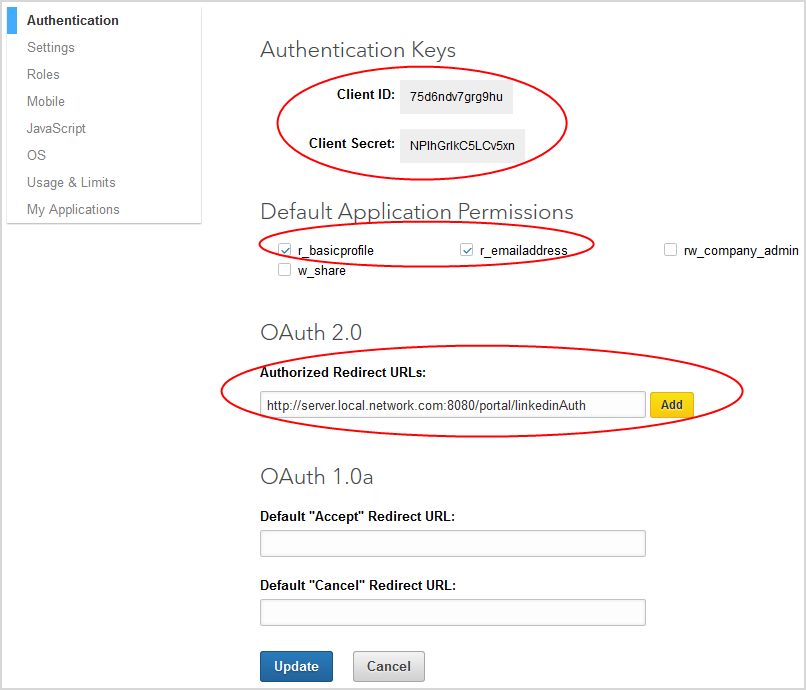
Producttab, chooseSign In with LinkedIn using OpenID Connectand click onRequest Accessto add OpenIdConnect to your app - On
Authtab, in part `OAuth 2.0 settings, add and authorized redirect url : https://${domainName}/portal/linkedinAuth (Replace domainName with your real domain name) - Get ClientId and ClientSecret for the next step of configuration.
- Go to the https://developers.google.com/ (opens new window). Here, access the Google Developers Console page (in the Developer Consoles category near the bottom) and register as Google developer if not yet.
- Create your project first, then go to it.
- In the Gallery icon --> API Manager part --> Overview, make sure Google+ API is enabled.
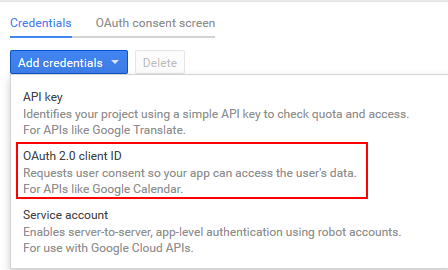
- In the Credentials part, click Add credentials and select Oauth 2.0 client ID.
- Select Web application. In the Authorized redirect URIs field, input http://server.local.network.com:8080/portal/googleAuth (opens new window).
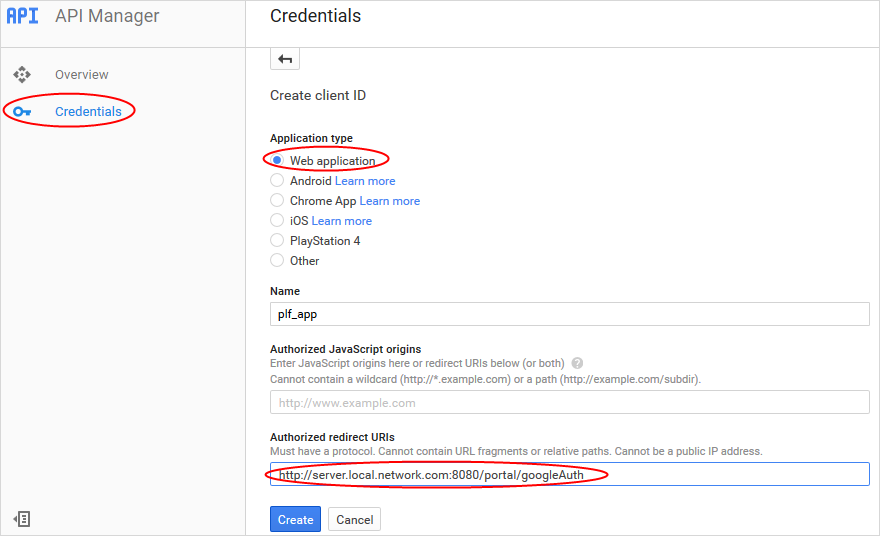
- Click Create and view information of Client ID, Client Secret and Redirect URIs.
# OpenId
The OpenId configuration depends on which implementation you use, but the steps are similar : You have to create an application, provide Authorized Redirect URI, which is http://server.local.network.com:8080/portal/openidAuth (opens new window) Then, you will be able to obtain a client ID, and a client secret from the openID provider
# Setting up eXo Platform
It is assumed that your eXo Platform instance will be executed on the host: server.local.network.com (remember to set up your host, for example, by adding it to /etc/hosts on Linux), so you will need to:
Change the property
exo.base.urlto the value of your host. SeeServer base URLfor details.# OAuth exo.base.url=http://server.local.network.com:8080Make configurations for the social networks that you want in
exo.properties.## Facebook exo.oauth.facebook.enabled=true exo.oauth.facebook.clientId=Facebook_App_Id exo.oauth.facebook.clientSecret=Facebook_App_Secret ## Twitter exo.oauth.twitter.enabled=true exo.oauth.twitter.clientId=Twitter_Consumer_Key exo.oauth.twitter.clientSecret=Twitter_Consumer_Secret ## LinkedIn exo.oauth.linkedin.enabled=true exo.oauth.linkedin.apiKey=LinkedIn_Client_Id exo.oauth.linkedin.apiSecret=LinkedIn_Client_Secret ## Google Plus exo.oauth.google.enabled=true exo.oauth.google.clientId=GooglePlus_Client_Id exo.oauth.google.clientSecret=GooglePlus_Client_Secret ## OpenId exo.oauth.openid.enabled=true exo.oauth.openid.clientId=OpenId_Client_Id exo.oauth.openid.clientSecret=OpenId_Client_SecretIn which:
exo.oauth.{OAuth_Provider}.enabled- Enables the integration with the social network. Users will now be able to log in and register with their social network accounts.exo.oauth.{OAuth_Provider}.clientId- Client ID of your application.exo.oauth.{OAuth_Provider}.clientSecret- Client Secret of your application.
For OpenId, you need to add 1 more property which is the url of the resource named well-known configuration file. In this file, all other information are present. This configuration is implicit in other providers, but as OpenId can be implemented in different ways, we have to provide url. In url, replace openid.server.com] by the name of your OpenId server.
  ## OpenId Urls
  exo.oauth.openid.wellKnownConfigurationUrl=https://openid.server.com/.well-known/openid-configuration
TIP
Google provide an OpenId protocol implementation. You can use it by creating an Oauth 2.0 client ID (as explained previously), and by using it as openid provider, with theses parameters :
    exo.oauth.openid.enabled=true
    exo.oauth.openid.clientId=GooglePlus_Client_Id
    exo.oauth.openid.clientSecret=GooglePlus_Client_Secret
    exo.oauth.openid.wellKnownConfigurationUrl=https://accounts.google.com/.well-known/openid-configuration
Finally, for OpenId, you need a redirectUrl which will be called by your openid server after successful authentication. This url will read the logged-in user, and redirect him to the portal
exo.oauth.openid.redirectURL=http://server.local.network.com:8080/portal/openidAuth
When using OpenId, the eXo session can expire before the IDP session. In order to transparently relog the user in eXo when the session is expired, we use a cookie. The default lifetime of this cookie is 24 hour. This mean that, during 24 hours, even if the user session is expired in eXo, the user will be reconnected using the OIDC flow. During this time, if the session have expired on IDP side, the login in eXo will not be possible, and we will display the eXo login page.
To configure the lifetime of this cookie, you can set this property :
   #oidc cookie lifetime (in seconds). Default Value : 86400
   exo.oauth.openid.cookie.lifetime=86400
When using OpenId, when a user logs out, you can decide if you want to propagate the logout to the IDP. If the well-known configuration file contains an url for end_session_endpoint, eXo Platform can call this url to logout the user from the IDP too.
By default, the logout propagation is disabled. To enable it, you can set this property in exo.properties :
exo.oauth.openid.propagate.logout=true
Restart eXo Platform server. Your users should be able to register or log in with their social network accounts.
# On-the-fly registration
The on-the-fly registration mode is option that allows administrator to skip the Registration form for the new social accounts that log into eXo for the first time. If the option is not turned on, users will have to edit their social information for the first login into eXo Platform.
- Configuring the on-the-fly registration
By default, the Registration form is skipped for the three networks following:
exo.oauth.registraterOnFly=FACEBOOK,GOOGLE,LINKEDIN,OPENID
The on-the-fly registration option is not turned on for Twitter by default. In case of the on-the-fly registration, a random password will be generated for the new user. So the only way for the user to know his password is via the Forget password function (which will require email address). The Twitter site does not allow third-party application to get user email, so it is recommended you do not enable this option for Twitter.
# On-the-fly registration with OpenId
With OpenId Connect, you can add properties in the token, other than the mandatory ones. This properties can be used to fill the user profile in eXo Platform.
For that, you will need to define this properties in exo.properties :
exo.oauth.openid.scope=openid email profile customScope
This property will indicate to OIDC the custom scope to require. By default, the scope is openid email profile. In this example, we add customScope which add properties defined by the OpenId provider.
exo.oauth.custom.claims=property1,property2,property3
This property will indicate to eXo which properties to read from the token, and to fill in the user profile. The properties are separated by a comma. Theses properties must be also defined in the eXo Profile configuration. You can set it in the Administration menu in eXo Platform. Be sure to set the same name as in the token.
exo.oauth.custom.claims.multivalue.separator=;
If some properties are multivalued, you can set the separator used in the token to separate values. By default, the separator is ;.
Be sure to configure the property in the eXo Profile configuration as multivalued too.